Tuesday, December 29, 2009

In Record Time: Part Two

Record Album Box


After you've melted your vinyl down into bowl form... repurposing the album cover for a gift or storage box is a cinch!
THIS half of the project actually took longer to complete than the bowl itself, but is no less simple to do.

You'll Need:
record album cover
ruler
utility knife
scissors
pencil
glue
clear packing tape

Step 1. Gotta keep 'em Separated
Pry apart the record album cover, separating the back from the front. If there are extra spine bits that stick out, trim them away so you have two nice, neat, more-or-less square pieces of board of equal size.

Step 2. Smooth Sailing
Use the packing tape to make a clear border around all the edges; this will keep the edges nice and smooth.

Step 3. Measure twice...
Take the front cover and place it face down on the table.
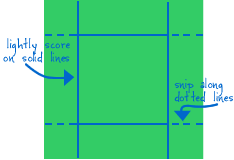
Draw four straight lines, each H" in from each edge of the cover, where H = the height you'd like your finished box to be.

Using the lines you just drew, make cuts to create four tabs (see diagram below).
Now LIGHTLY run over the uncut lines with your knife; this will score the cardboard and make it easier to fold. Make sure not to apply too much pressure, as you just want to break the surface of the board, not cut all the way through.

Step 4. Fold it like you mean it
Fold along the lines you scored in step five. You'll find it's easier to fold the board outwards first, which is the exact opposite of how the final folds need to go. Once you've made the backwards fold, it should be easy to bend the cardboard in the opposite direction to fold inwards.

Step 5. Assembly Required:
Apply an even coat of glue (or... just use more packing tape) to the tabs, and press the sides of the box to the tab.

Step 6. Bottoms Up!
Time now to make the bottom half of the box. Place the back cover face down on the table. Draw four straight lines, each H"+1/16" from each edge of the cover (the extra 1/16" will mean the box bottom is a little smaller than the box top; this ensures that you'll be able to slide the two pieces together. For a looser fit, you can increase the allowance to 1/8"). Repeat steps 4 - 6.

Viola! That's it!
You can thank me later. These totally rock


Tuesday, December 15, 2009

Christmas Card Photo Shoot

It's that time of year again.
Time to dust off the address book, buy the cheesy Christmas stamps and reconnect with the loved ones you've lost track of. It's time for Christmas Cards...


Honestly, I love letting my mantel clutter up with cards from across the country. I've got family and friends far and wide and delight in getting random updates. What I'm horrible at? Getting my cards out on time...


This
year, I'm determined to get these suckers out on time.
I've typed up the letter. I've bought card stock and stamping implements.
I just need the perfect picture.
Bribery was three very giant candy canes.
Result was three very VERY sticky munchkins.


(Baz as a blur, above, is terribly appropriate)


(Stinky Feeeet!)

Tuesday, December 8, 2009

In Record Time...

While hunting up some inexpensive yet personalized holiday gifts for the gang... a friend of mine clued me in on one of the best ideas evah... Record Bowls.
They're decorative.
They're unique.
They're SUUUUPER easy to make.
And, you can tailor them to the giftee via the album you choose to melt.
It's a win-win-win situation.
So here's the How To:


Record Bowls

Step 1. Choose your Tunes
I picked up a handful of albums at my local Goodwill. They're $1.99 and there's always a ton to choose from. If you're looking for a favorite artist or genre you can always order them online (helloooo eBay!) or hit up your local independently-owned record store. Believe it or not, they DO still make & sell vinyl folks!


Step 2. The Heat is On
Preheat your oven to 200F

Step 3. Insert Tab A into Slot B
You'll need 1 cookie sheet, 1 heat-proof bowl, 1 record
Center record on top of bowl.
Place bowl on cookie sheet.
Insert cookie sheet into oven.


Step 4. Dance Break!
Set a timer for 5 minutes.
Take a dance break.
(any less and the vinyl's not terribly pliable)
(too much longer and the vinyl gives off some nasty noxious fumes)

Step 5. Shape it Up
Take the entire stack out of the oven.
IMMEDIATELY start shaping your album.
The Vinyl Will Cool Unbelievably Quickly!!!!!
You have a couple of options here.
You can either shape the album with your hands, or drop it into a larger bowl and let it lend its shape to the album. I kind of just combo'd it. I dropped the album into a large bowl & shaped the folds with my hands. Work quickly, but if the vinyl cools before you're done don't force it, just pop it back in the oven for a couple of minutes before giving it another go.


Step 6. The Cool Down
Allow your new Record Bowl about 10-15 minutes to cool completely and finish setting up.
You now have one completely original bowl in which to display fruit, candy, coasters, knick-knacks, bric-a-brac and other hyphenated miscellany...


*looking to give these as a gift?
Check back soon for the How To on making a gift box out of the album cover...
It's a-coming!


Monday, November 16, 2009

Mojo-fied CornHole Bags


Due to a FailStock Theft...
an unnamed man was left sans bags for his cornhole set.
Since I had nothing better to do...

CornHole Bags.
Materials:
Eight 7 x 7 squares of duck cloth
*note - you apparently cannot buy duck cloth @ JoAnn Fabrics without every bluehair that works that nodding and asking "Ahhh... cornhole bags?".
Heavy duty thread
*
note - i'm not kidding - these things take a beating!
Fabric Glue
Feed-Grade dried corn
*NOT popcorn. Although plastic pellets can also be substituted in a pinch or for the non-purists. Most people like the feel of, and the dust created by, the use of dried corn. Hence the name of the game...


Step 1. Measure twice. Cut Once
Four bags each in two colors.
Mark & cut 7" squares.

Step 2. Sew it Up
Stitch three of the four sides usuing a 1/2" seam allowance.
Use your fabric glue to glue down the remaining 1/2" flaps near the seams. This will ensure that your bags resist bursting.
Once your glue is dry, turn those babies right-side out.

Step 3. Full to Bursting
According to most literature I found, bags should be 16oz. Your fabric's going to weigh about 1/2 an ounce, so take that into account. Easiest thing is to beg/borrow/steal a kitchen scale for exact measurements.
*note - a FUNNEL is a biiiiiig help here.

Step 4. Final Jeoparody
Toughie. That corn/filler has a mind of it's own. Those little buggers do NOT want to stay put. Pinning the seam is a pain in the rear. I suggest double stitching with a running stitch to keep the fourth side closed, then a whipstitch over the top. It's not pristine, but it's secure!


Thursday, September 24, 2009

T-shirt Decon: IndyMojo returns

Thanks to the generous donation of one gorgeous Ms. Coddington,
I have yet another IndyMojo Tshirt to play with.
Last night, I decided to vent a build up of frustration on said poor, unsuspecting T.

enjoy!


Knot so Fancy...
1. Pick your poison


2. Straight up now Tell Me...
Slice straight up through each side of the T, just inside the seam of the sleeve.


3. Hack Job
Off with his head!


4. Fringe Benefits
Fringe out the sides of the tube.
Your waist measurement (as it turns out) works perfectly for this.
Divide your waist measurement by 2 (ex: 30"/2 = 16").
Now subtract 2 (16" - 2 = 14").
Center this measurement on the Tshirt. Chalk the edges.
Fringe the side of the shirt to the line.
I made cuts every 2 inches, but there's room for variety here...


5. Knot so savvy
Tie off each paired up fringe.


Voila!

*this works well as an off the shoulder shirt OR a skirt - but put a friend on booty duty (or wear some funky stockings under it) as this puppy will shift as you shimmy...

Friday, September 4, 2009

T-shirt Decon: IndyMojo Take Two...

Caveat: It's done. But I'm not pleased with it... *

Here's the How To on the tube dress.
This one is easily adapted into a shirt/tunic.
*Stay tuned for a follow up How To on how to re-deconstruct this one with a better flounce to the skit. I'm gonna add some panels into the bottom have so it'll flounce when I spin. Because, let's face it, I love to spin! Don't judge.

Step 1. Pick your poison.
Hadn't done anything in black lately!
Here Goes...


Step 2. The Basics
Remove (as always) the side portions including sleeves and the top just below the collar.


Step 3. Hemmin' & Hawin'
Match them up front to front, so the insides are showing. Fold down the top 1/2 inch or so and hem into a casing (giving yourself ample room to thread with elastic!).


Step. 4 Side Together... Back Together... and We're Waltzing...
Stitch up the sides (still inside out, mind you) to form a generic tube.


Step 5. Now What?
Here's where I got stumped... I didn't know what I really wanted to do with this thing...
So I added some opp. color silk binding to the bottom and figure it can either be (a) a random, rather shapeless mini dress; or (b) with some slight alteration and some side-ruching, a longish tube/tunic top.


Either way, this baby was easy to make.
Like I said, once I wear it out Friday I think I'm gonna rip it up and keep the top elastic portion for the bust and maybe attach a flounced/paneled skirt to the bottom half for spinnability.


Happy Stitching!

Friday, August 28, 2009

T-shirt Decon: IndyMojo Style

A little Stitch Witchery @ 2am and here's what I came up with...


Read on for the How To:
Step 1. Gather your shirts.
For this project you're going to need 2 L or XL shirts.
And, because I'm planning to rock this little number out with the Mojo crew...


Step 2. Stack & Snip
Once you've chosen your two colors/shirts, just stack them and snip off the sleeves on either side, the collar from the top, and any excess from the bottom so that you're left with four pieces of 20" square fabric.


Step 3. Arc! Who goes there?
Cut a gradual arc from the bottom left corner up through the upper right corner of the shirt. Then, take your waist measurement (ex: 30") and divide by 6. Then measure down and across by this number at the upper left corner. Snip it right off. (This will ultimately become the waist band of your skirt)


Step 4. Come Together, Right Now
Lay it out all pretty, in alternating colors.
Now turn it over, and pull out the Singer...


Step 5. Assembly Line
Match up your edges and go to town.
This step is pretty much a no brainer, right?
Good, let's move on...


Step 6. Tulle Makes it Allll Better
And, because I'm feeling funky, we're adding a couple layers of tulle to this puppy. Fun, right?!
Turn your skirt inside out. Now fan fold the tulle to create some pleats and whipstitch it to the interior of the skirt. Careful! The tulle wants to stick to everything... including your thread.


Step 7. Cheater Edging/Stitch Witchery
I know I've divulged that I'm a bit of a cheater when it comes to sewing... and nowhere is it more evident than right here, kids.


Stitch Witchery is my best friend.
You cut the fusable webbing to the desired length, sandwich it between two layers of fabric and iron for 10 seconds. The only thing more awesome than that? Stumbling across some silky blankie edging at JoAnne Fabrics last week! So I reverse-hemmed the waistline of the skirt with the black edging. This serves two purposes: (a) it gives the skirt a nice polished look, and (b) it keeps the itchy tulle away from your skin at the waist band. Trust Me this is a good thing!

Viola!
Finished Skirt!
No picture for you today, kids!
You wanna see this one, you'll have to come hunt me down.
I'll be at Howl @ the Moon tonight!

Friday, August 21, 2009

Bacon Flowchart

Bacon = A Little Slice of Heaven


i know... i know... I owe this place an update.
I've been all sorts of crafty lately, but I can't post it until Monday
Presents are surprises people!!!

Wednesday, August 12, 2009

They Grow Up So Fast these days...

You know that lump you get in the back of your throat when you're trying desperately not to cry? The one that accompanies the tears threatening to spill over as you walk away?
Yeah. I got that today...

All week Isabelle's been telling me she's "nervous, but realllly excited". And after last nights' Back To School Nite she was just "Reallllly Realllly excited, Mom. Not nervous at all. Not anymore". Until this morning. Rob and I walked her in, one of her tiny little paws in each of ours, and I couldn't let go. She looked up at us and she had tears in the corners of her eyes and her nose started turning suspiciously red (it happens. we get rudolph nose in my family when we cry. it's not pretty) and I nearly lost it. But after about 2 minutes she squared her shoulders, hung her new princess backpack up on a peg and took a step forward. She's braver than her Momma; I was rooted to the floor.

Check out the classic First-Day-of-School pose (above) I'm pretty sure your can chronicle my (and my siblings') life by 12+ years of pictures just like this. I had to do it


And next year? Next year Baz will be doing this to. ohgodimnotready...


Tuesday, August 11, 2009

LoLLaPaLooZa: Trying to be Original... Just Like Everybody Else


::: LoLLaPaLooZa :::
130 Bands
3 days


Depeche Mode * Tool * The Killers * Jane's Addiction * Kings of Leon * Yeah Yeah Yeahs * Lou Reed * Ben Harper * Thievery Corporation * Snoop Dogg * Rise Against * Andrew Bird * TV on the Radio * Vampire Weekend * The Decemberists * Neko Case * STS9 * Animal Collective * Band of Horses * Of Montreal * Artick Monkeys * Coheed and Cambria * Ben Folds * Fleet Foxes * Silversun Pickups * Kaiser Chiefs * Crystal Castles * Bon Iver * Santigold * Atmosphere * Dan Auerbach * Cold War Kids * Deerhunter * Lykke Li * Robert Earl Keen * Peter Bjorn and John * Heartless Bastards * Gomez *Glasvegas * Frederico Aubele * Dan Deacon * Passion Pit * Zap Mama * The Raveonettes * The Gaslight Anthem * The Airborne Toxic Event * White Lies * Ra Ra Riot * No Age * Asher Rother * Los Campesinos! * Bat For Lashes * Chairlift * Gan Gang Dance * Black Joe Lewis & the Honeybees * The Virgins * Amazing Baby * Portugal. The Man * The Knux * Ida Maria * Delta Spirit * Friendly Fires * Manchester Orchestra * Constantines * Ezra Furman & The Harpoons * Hockey * Mike Snow * Alberta Cross * Hey Champs * Sam Roberts Band * The Henry Clay People * Davy Knowles & Back Door Slam * Cage the Elephant * Living Things * The Low Anthem * Blind Pilot * Langhorne Slim * Other Lives * The Builders and the Butchers * Eric Church * Joe Pug * Kevin Devine * The Greencards * Carney * Thenewno2 * Gringo Star * Ke$ha * Esser * Priscilla Renea * Dirty Sweet * Mike's Pawn Shop * April Smith * Band of Skulls * Ralph's World * Paul Green's School of Rick * Secret Agent 23 Skidoo * Zach Gill * Lunch Money * Frances England * Peter DiStefano & Tor * Q Brothers * Car Bears of Fire * Yuto Miyazawa * Last Band Standing Remix


This year's LoLLa lineup read like a who's who of up and comings rather than the powerhouse of glory bands it seems to have been in years past, and I couldn't have been more ecstatic. On the whole, it contained more pasty UK dudes than a British soccer match. The North Field corralled the Bearded Masses with Love-in session acts like Bon Iver, Fleet Foxes, The Decemberists and Andrew Bird. The Citi Stage was a Pitchfork Addicts wet dream all weekend with acts including The Knux and Amazing Baby on Friday; Chairlift, No Age & Lykki Li on Saturday; and Gang Gang Dance and Deerhunter on Sunday. Can you say hipster heaven? And the South end of Grant Park housed the we're-too-cool-to-admit-we-like-them anti-establishment groups: Depeche Mode, Tool, Ra Ra Riot, Vampire Weekend (admittedly one of my favorites!) Snoop and The Killers (damn, Sunday would have been a good day to go...)

Despite being soaked to the bone 10 minutes after arrival, there are definite benefits to having attended the Friday Festivities:
1) It wasn't 100+ degrees in the shade
2) You don't need a more legitimate reason to skip out of work on a Friday than this
3) The Bands (as a whole) were better Friday than any other day of the weekend
4)Port-a-potties were not yet filled to the brim with three days of urban-hipster poo

We were all cold, soaked and overpaying for cheap, crappy beer. But $2 can koozies made it all seem okay. I learned (among other things) the correct lyrics to every Ben Folds song played. I won bets in line for the port-o-lets, and I bore witness to two of the most awesome trades in human history: (1) Bartering swaths of TP for line jumping priveleges at the port-o-lets. *note The only thing that trumps a swath of bartered TP is the girl at the front of the line who brought her own baby wipes. It was a showdown at high noon, I tell ya. (2) Trading one Werther's Original (noted a fine, fine candy indeed by all parties involved) and two lifesavers mints (pocket lint intact) for a quick pull on a fellow concert-goer's smuggle whiskey.

And now, for your general edification, some Do's and Dont's of LoLLa...
DO: Knee-high Rain Boots, Multi-Colored Chucks, Retro 1980's Shades (preferably the slatted kind), White White Wedding Dresses (if you're a member of The Decemberists otherwise you'd just look silly), Sporting this year's Lolla shirt (apparantly this is one of the few venues where this is generally acceptable practice. Usually you'd receive a beat down, or at least scathing, haughty looks for doing this), Sued Buckskins. Seriously. Or dressing like Pocahontis.

DONT'S: Sundresses, Hemp Sandals, Gladiator Laceups, White T, no Bra (ew. just. ew.), Plaid camp shirts (In this girl's opinion, this look was cool for about 30 seconds, but when you're trying to be original, just like everybody else, it's suddenly trite and overdone), Rompers (Really? REALLY?!! How do you expect to navigate a port-a-potty in that overgrown onsie with a 24oz. beer in one hand and your park map in the other?)


I tease. I kid. But secretly I was in heaven.
I'm already plotting to go all three days next year.
I've started my paper chain countdown, have you?


Related Posts Plugin for WordPress, Blogger...