Tuesday, December 29, 2009

In Record Time: Part Two

Record Album Box


After you've melted your vinyl down into bowl form... repurposing the album cover for a gift or storage box is a cinch!
THIS half of the project actually took longer to complete than the bowl itself, but is no less simple to do.

You'll Need:
record album cover
ruler
utility knife
scissors
pencil
glue
clear packing tape

Step 1. Gotta keep 'em Separated
Pry apart the record album cover, separating the back from the front. If there are extra spine bits that stick out, trim them away so you have two nice, neat, more-or-less square pieces of board of equal size.

Step 2. Smooth Sailing
Use the packing tape to make a clear border around all the edges; this will keep the edges nice and smooth.

Step 3. Measure twice...
Take the front cover and place it face down on the table.
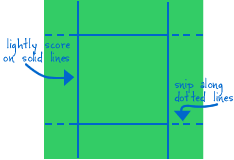
Draw four straight lines, each H" in from each edge of the cover, where H = the height you'd like your finished box to be.

Using the lines you just drew, make cuts to create four tabs (see diagram below).
Now LIGHTLY run over the uncut lines with your knife; this will score the cardboard and make it easier to fold. Make sure not to apply too much pressure, as you just want to break the surface of the board, not cut all the way through.


Step 4. Fold it like you mean it
Fold along the lines you scored in step five. You'll find it's easier to fold the board outwards first, which is the exact opposite of how the final folds need to go. Once you've made the backwards fold, it should be easy to bend the cardboard in the opposite direction to fold inwards.

Step 5. Assembly Required:
Apply an even coat of glue (or... just use more packing tape) to the tabs, and press the sides of the box to the tab.

Step 6. Bottoms Up!
Time now to make the bottom half of the box. Place the back cover face down on the table. Draw four straight lines, each H"+1/16" from each edge of the cover (the extra 1/16" will mean the box bottom is a little smaller than the box top; this ensures that you'll be able to slide the two pieces together. For a looser fit, you can increase the allowance to 1/8"). Repeat steps 4 - 6.

Viola! That's it!
You can thank me later. These totally rock


Tuesday, December 15, 2009

Christmas Card Photo Shoot

It's that time of year again.
Time to dust off the address book, buy the cheesy Christmas stamps and reconnect with the loved ones you've lost track of. It's time for Christmas Cards...


Honestly, I love letting my mantel clutter up with cards from across the country. I've got family and friends far and wide and delight in getting random updates. What I'm horrible at? Getting my cards out on time...


This
year, I'm determined to get these suckers out on time.
I've typed up the letter. I've bought card stock and stamping implements.
I just need the perfect picture.
Bribery was three very giant candy canes.
Result was three very VERY sticky munchkins.


(Baz as a blur, above, is terribly appropriate)


(Stinky Feeeet!)

Tuesday, December 8, 2009

In Record Time...

While hunting up some inexpensive yet personalized holiday gifts for the gang... a friend of mine clued me in on one of the best ideas evah... Record Bowls.
They're decorative.
They're unique.
They're SUUUUPER easy to make.
And, you can tailor them to the giftee via the album you choose to melt.
It's a win-win-win situation.
So here's the How To:


Record Bowls

Step 1. Choose your Tunes
I picked up a handful of albums at my local Goodwill. They're $1.99 and there's always a ton to choose from. If you're looking for a favorite artist or genre you can always order them online (helloooo eBay!) or hit up your local independently-owned record store. Believe it or not, they DO still make & sell vinyl folks!


Step 2. The Heat is On
Preheat your oven to 200F

Step 3. Insert Tab A into Slot B
You'll need 1 cookie sheet, 1 heat-proof bowl, 1 record
Center record on top of bowl.
Place bowl on cookie sheet.
Insert cookie sheet into oven.


Step 4. Dance Break!
Set a timer for 5 minutes.
Take a dance break.
(any less and the vinyl's not terribly pliable)
(too much longer and the vinyl gives off some nasty noxious fumes)

Step 5. Shape it Up
Take the entire stack out of the oven.
IMMEDIATELY start shaping your album.
The Vinyl Will Cool Unbelievably Quickly!!!!!
You have a couple of options here.
You can either shape the album with your hands, or drop it into a larger bowl and let it lend its shape to the album. I kind of just combo'd it. I dropped the album into a large bowl & shaped the folds with my hands. Work quickly, but if the vinyl cools before you're done don't force it, just pop it back in the oven for a couple of minutes before giving it another go.


Step 6. The Cool Down
Allow your new Record Bowl about 10-15 minutes to cool completely and finish setting up.
You now have one completely original bowl in which to display fruit, candy, coasters, knick-knacks, bric-a-brac and other hyphenated miscellany...


*looking to give these as a gift?
Check back soon for the How To on making a gift box out of the album cover...
It's a-coming!


Related Posts Plugin for WordPress, Blogger...